


 Network Security
 Vulnerability Management
 Privileged Access Management
  Endpoint Security
 Threat Hunting
 Unified Endpoint Management
 Email & Collaboration Security


Contents:
The news about Cambridge Analytica firm harvesting personal data taken from millions of Facebook without user consent in 2014 hit the headlines these days.
Everyone is talking about it and everyone should take a few moments of reflection about the privacy of our data on the Internet. Users even started deleting their Facebook accounts (probably) inspired by the big movement #DeleteFacebook (urging people to leave the social network), while others may be really concerned about the exploitation of personal data.
You can follow this thread on Twitter and see what people have to say about it. However, if you aren’t ready to delete your FB profile, or you don’t see this as a viable solution, here’s how to use Facebook in the safest way and take control of privacy settings.
It’s worth reminding that Facebook will *still* know things about you, but at least you can limit its access to your private data.
Almost everyone has a Facebook account, but the problems occur when the distinction between public and private space become blurred. Without a clear understanding of our security and privacy settings, we easily may end up victims to identity theft, phishing attacks or other malicious actions.
Before we begin, here’s a set of helpful links to help you navigate the guide and see what you can learn by reading on:
General Account Settings
Security Settings
Privacy settings
Timeline and tagging settings
Blocking
Mobile
Public post filters and tools
Apps
Ads
Here’s how to keep your Facebook account secure
Start by accessing your Facebook account settings.
To do this, log into your Facebook account and go to the top right corner of the screen and select “Settings” from the drop-down menu.
We’ll take each section and discuss it separately before we continue to the next one, as they appear in the Settings menu.
1. General Account Settings
After you click on the Settings button, it will take you to the General Account Settings.
Your profile tells a story to the one who’s viewing it, so you can choose how you can want to appear online. From there you’ll be able to manage and edit the basics information about you like name, surname, email address, or choose your legal contact settings.
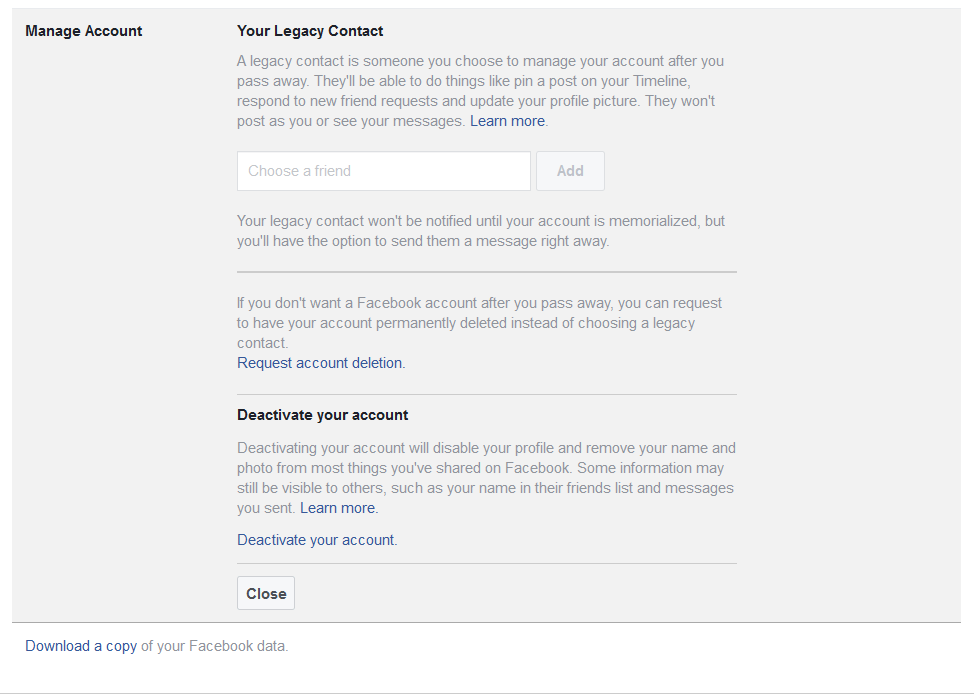
You can inform Facebook in advance whether you’d like to have your account memorialized after you’ve passed away or permanently deleted from Facebook.
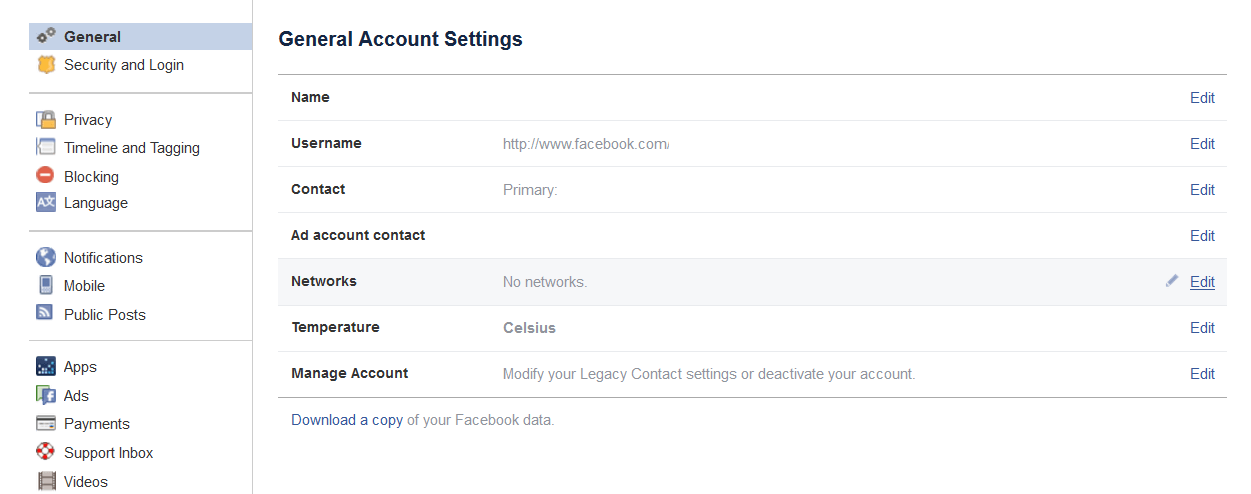
You can also download a copy of your Facebook data. This includes your Timeline info, shared posts, messages, photos, ads you have clicked on, the IP addresses where you’ve logged into your account, and more other details.
You can also have the option to download a copy of your Facebook data. This includes your Timeline info, shared posts, messages, photos, ads you have clicked on, the IP addresses where you’ve logged into your account, and more other details.
Deactivate Your Account
If you are planning on quitting the social network for a while, from this place you can choose to temporarily deactivate your account. Some information will still be available to others, such as your name in their friends list, or the messages you exchanged. You should know that this option doesn’t permanently delete your account and you’ll be able to reactivate it at any time you want.
However, if you’re serious and you want to permanently delete your account, you can do that from here. Keep in mind that it may take up to 90 days before the deletion process begins. You might also want to consider downloading an archive of your data beforehand.
2. Security Settings
We continue to the Security and Login Settings.
From here you’re able to set:
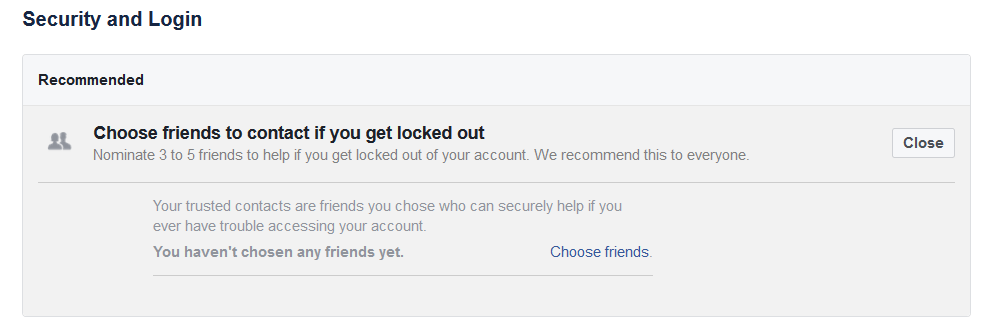
Choose friends to contact if you get locked out
Facebook recommends this feature for its users in case they are locked out of their account. From this place, you can select your close friends that will help you in case you ever have trouble accessing your Facebook account.The option lets users nominate 3 to 5 trusted contacts.
By clicking on Choose friends you will receive instructions to follow. After you have selected your friends, they’ll be able to send you a recovery code with a special URL you can use to get back into your account. You can always change or edit the chosen friends. Find out more info here.
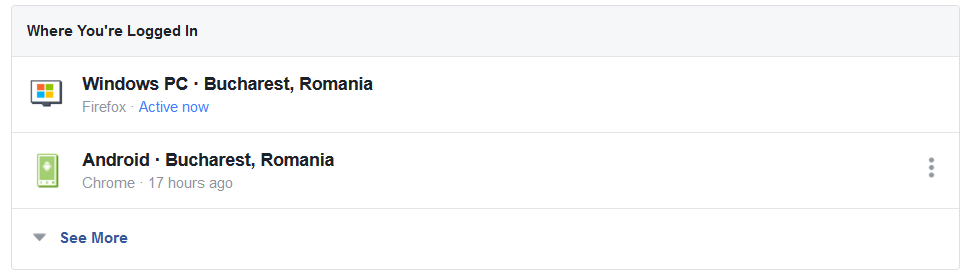
Where you are logged in
This feature provides details about your current location and what browser used. Facebook also tracks your previous sessions offering the following information: logging time, device, address, and IP.
Login
Here you have the option to Change your current password. We highly recommend setting a strong and unique password.
Strong: so that nobody with malicious intentions will be able to guess it. That means no easy and common passwords, no family names, no nicknames, no birth dates, no favorite songs or movies or mottos, no nothing that can easily be found out about you.
Unique: because if one of your accounts is breached, all your other accounts where you used the same password will end up compromised. It doesn’t even have to be your fault.
You might have heard that about 1.9 billion data records were exposed in breaches in the first half of 2017, according to the Breach Level Index.
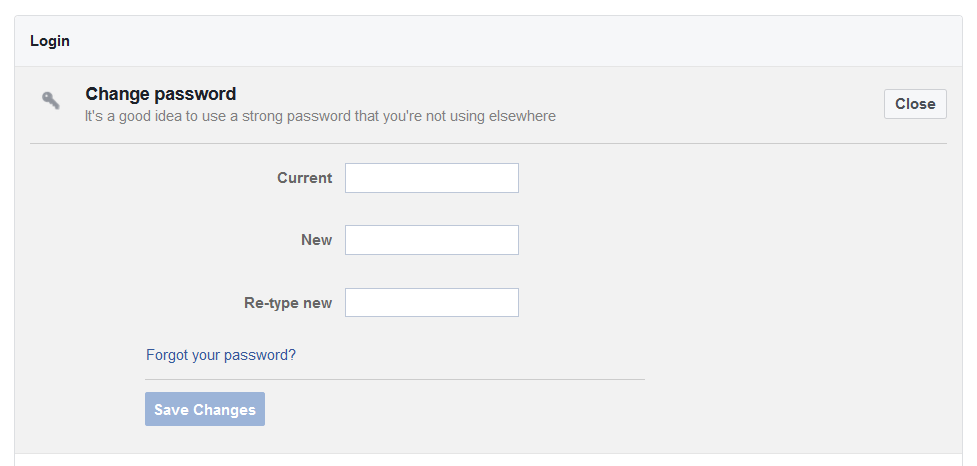
If you don’t remember your current password, you can reset it by clicking Forgot your password? and follow the steps to reset it. Keep in mind that you’ll need access to the email associated with your account.
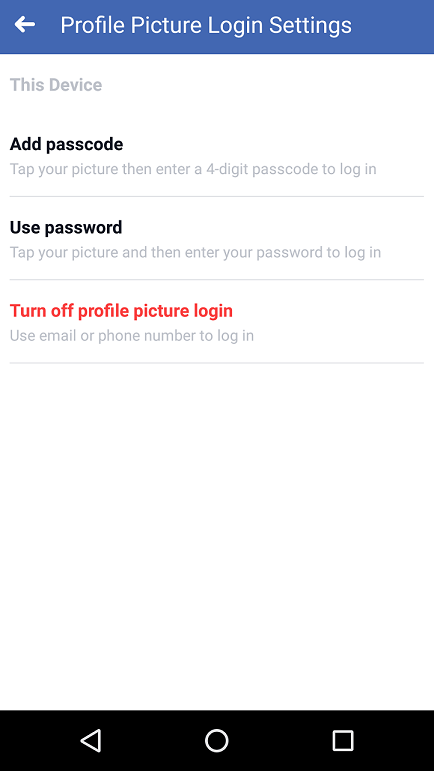
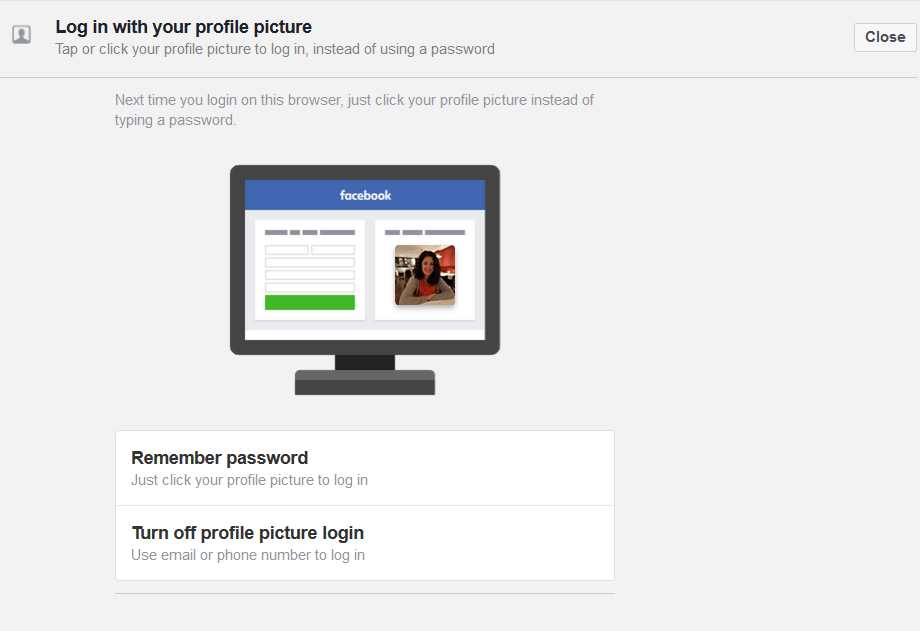
Log in with your profile picture
If you are using the Facebook mobile app, you have the option to log in with your profile photo by just tapping on the picture, instead of using a password. Once enabled this feature, you can use it when you log out of the app or uninstall it, and need to log in again. Facebook requires explicit permission to enable it, so you can choose to turn it on or off.
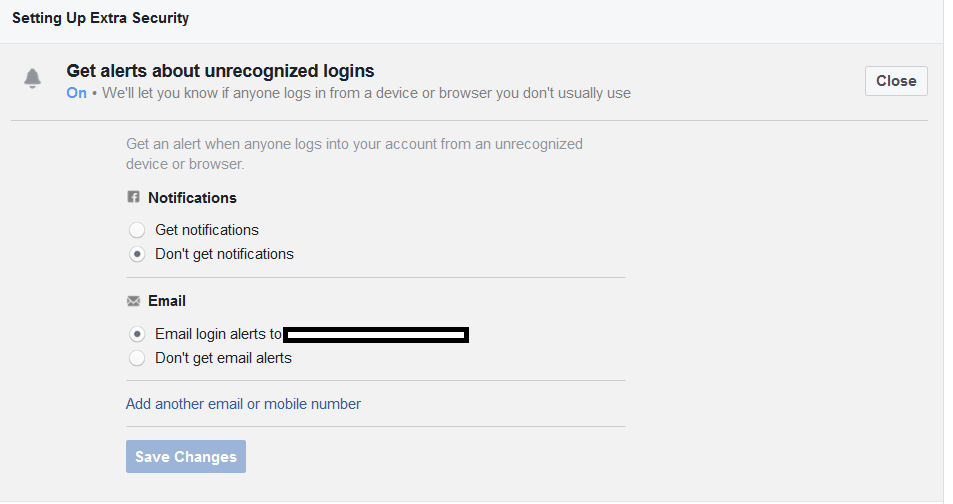
Setting up extra security
To enhance protection, we suggest using the following extra layers of protection. First off, you can enable to receive notifications via email if anyone logs in from a device or browser you don’t usually use. If it doesn’t recognize your usual login, an alert will be sent to your email.
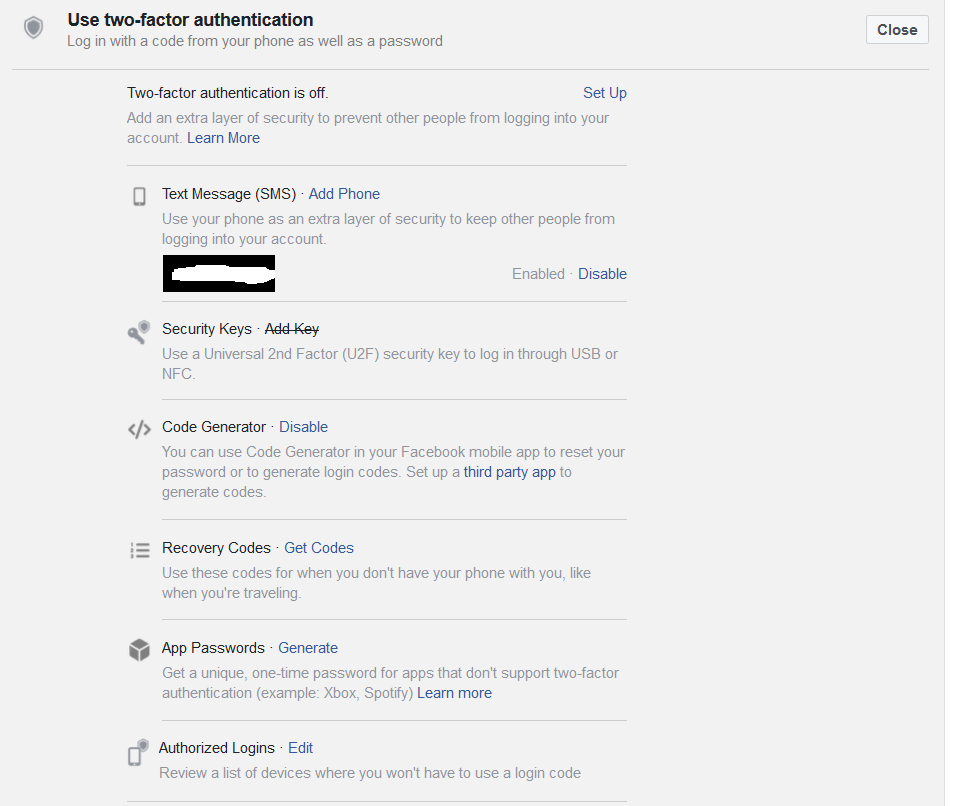
Use two-factor authentication
By activating this option, the network will require you to authenticate with a second security code every time you’ll want to access your account on a new browser or device. Read our dedicated article on why you should use two-factor authentication feature.
You have 7 options:
- Turn on two-factor authentication;
- A security code sent by SMS to your mobile device;
- Security keys for safer logins;
- Generate a security code using Code Generator from your Facebook mobile app;
- Recovery codes when you don’t have your phone with you;
- App passwords you can use instead of your Facebook account password;
- Authorized logins.
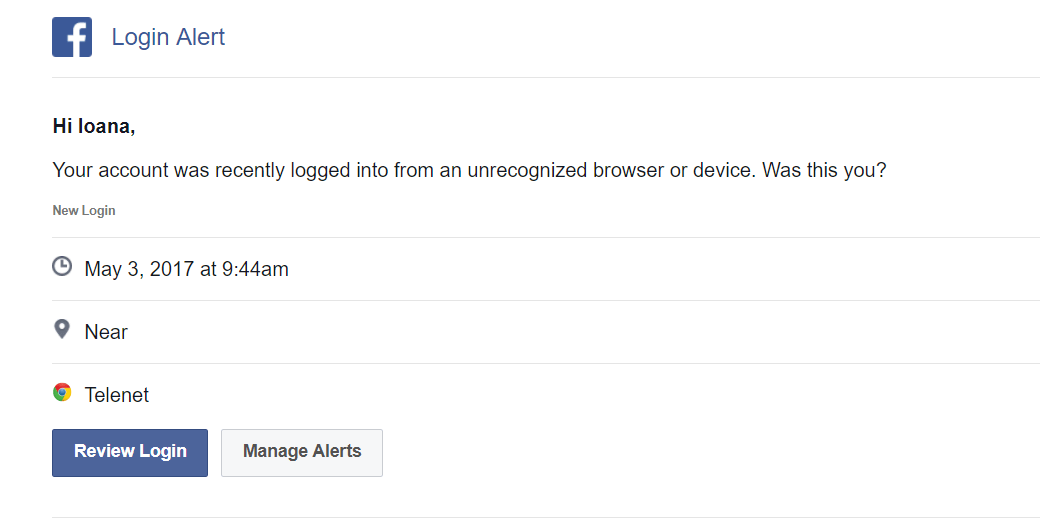
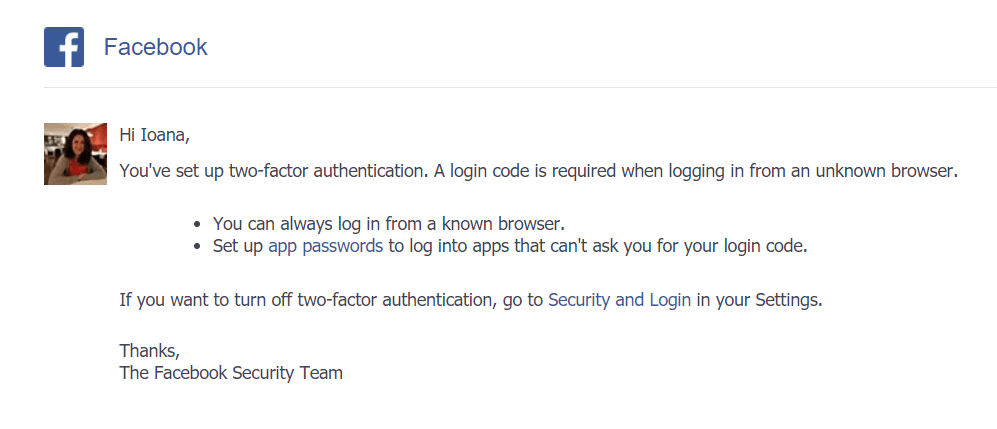 To activate two-factor authentication feature, click the Setup button, confirm this action by enabling it and re-enter your password. You will receive an email (see the photo above) informing you that you’ve activated it. To disable this feature, follow the steps described in the Settings section.
You can use a Universal 2nd Factor (U2F) security key to log into your account through USB or NFC.
Code Generator
Use this option together with Login Approvals to create new authentication codes. You’ll use these to access your Facebook account from a new device.
App Passwords
This option helps you create single-use passwords in order to access third-party apps on Facebook and keep your main password safe.
When you’ll log out of the app, the password will not be saved. To access the app again, you’ll need to generate a new, single-use password.
Authorized Logins
This option shows a list of devices where you won’t have to use a login code.
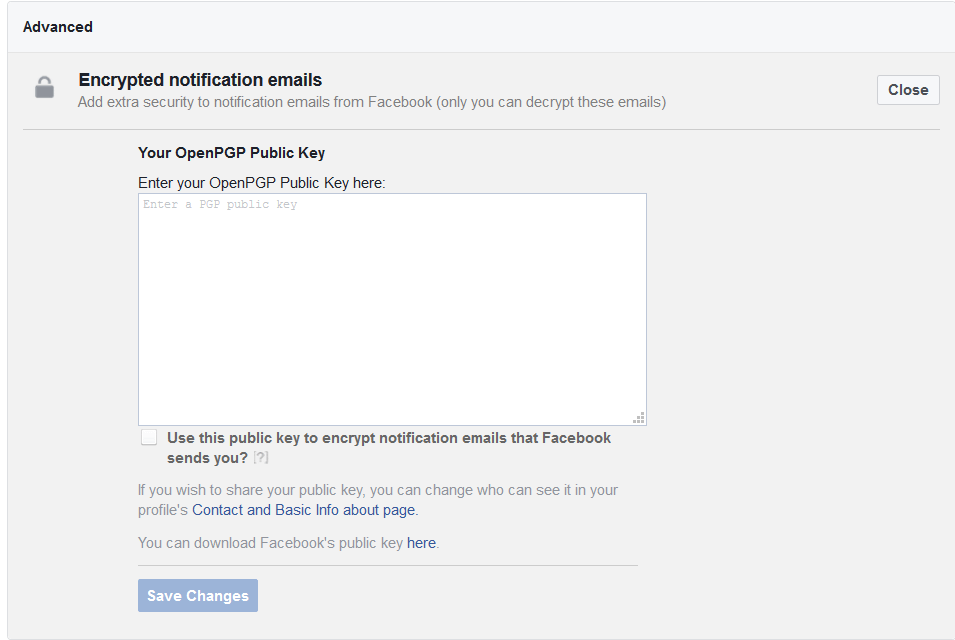
Advanced (Encrypted notification emails)
Facebook offers users the option to add extra security with an Open PGP public keys to their profiles and select to receive encrypted notification emails from Facebook (only you can decrypt these emails).
3. Privacy Settings
The next section is the Privacy Settings and Tools one. From here you’ll be able to tweak basic privacy settings and make sure that your past and future posts won’t be seen by intruders.
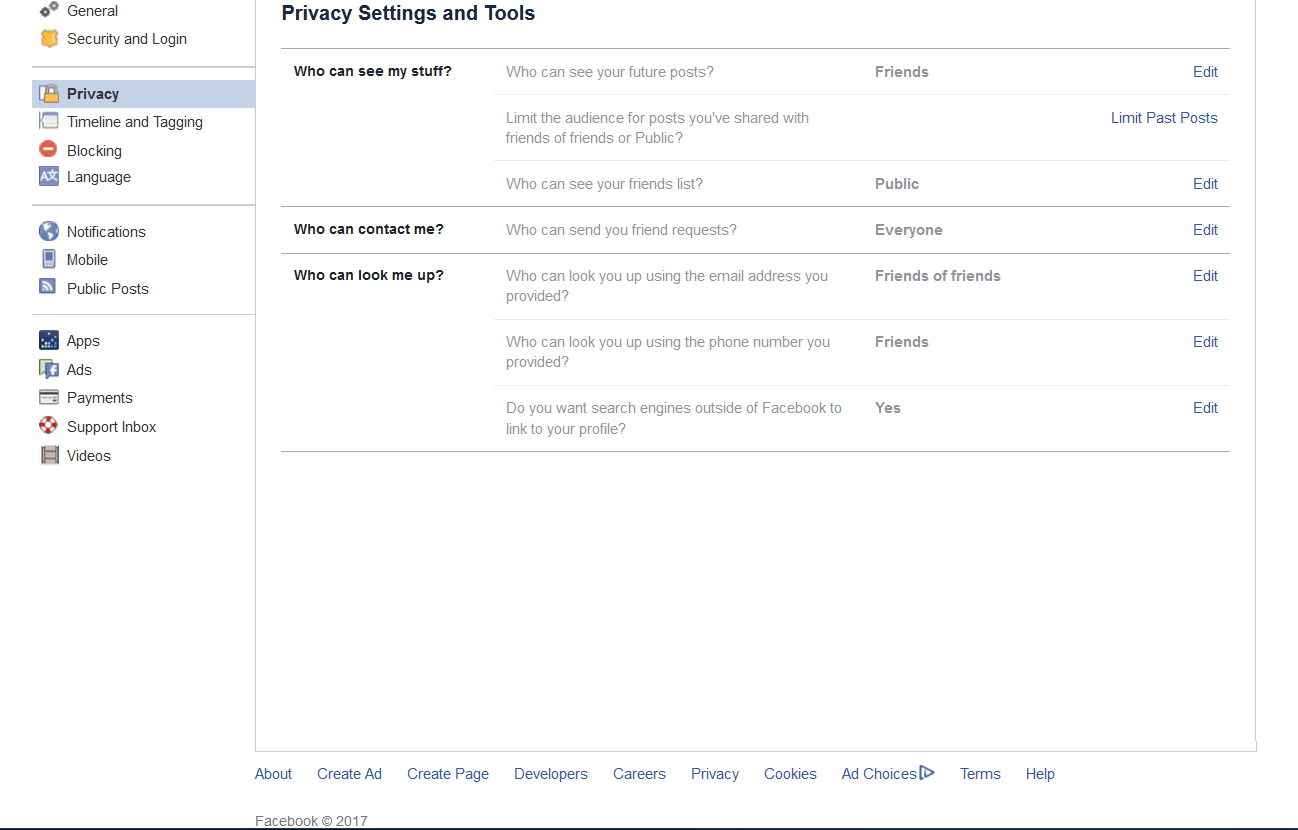
Who can see my stuff?
From here you can control the privacy of future posts. Select the appropriate audience for your future posts, you can share them with:
- Public (if you want everybody to see them)
- Friends
- Friends with Acquaintances
- Only Me
- Custom Audience (if you use Friends Lists)
It is recommended that you set the default sharing option to Friends. Unless you manually change it, Facebook will remember this option and post all your future statuses as only available to your Friends.
From the same location, you can also review your activity by using the Activity Log.
Keep in mind that even if you choose to hide a post or photo from your Timeline, the post or photo will still be uploaded online. From there on, you can either choose to Remove Tag or even Request the post to be deleted.
And one last feature available in this section: “Limit the Audience for Old Posts on Your Timeline” – guess this is pretty much self-explanatory, right? By using this tool, all the audience for the content from your timeline will be changed.
Who can contact me?
From here you can choose who’s able to send you friend requests.
If you want to be added as a friend by anyone in the world, even if you don’t have any connections in common, you need to set this option to everyone.
Who can look me up?
In this place, you can choose if you want people to find you using your email address or phone number.
From here you can also select if you want search engines, such as Google or Bing, to index your profile and link to it. If you deactivate this setting, your profile will be found only by people searching for your name directly on Facebook.
4. Timeline and Tagging Settings
Next in line: Timeline and Tagging Settings. This place allows you to set other privacy settings, such as who can post to your timeline, timeline visibility, and tagging.
We’ll take each separately.
Who can add things to my timeline?
This one is pretty straightforward. You can choose who can post on your timeline – if you also hate birthday wishes from unknown people who choose to post on your timeline, select “Only Me” instead of “Friends”.
From here you can also choose to review the posts you were tagged in by your friends before they appear on your timeline. Enable this option to keep spam or untrusted posts away.
Don’t forget that these posts will remain online and still appear in Facebook’s search or news feed. You’ll have to manually remove each tag or even ask the friends who uploaded them to delete them.
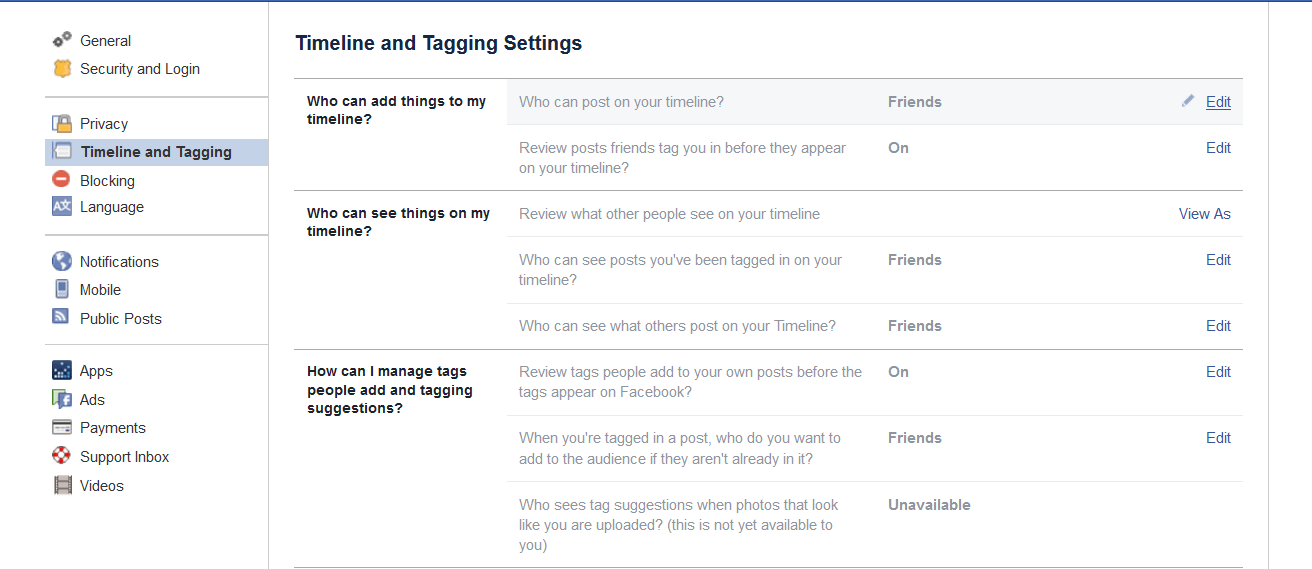
Who can see things on my timeline?
This option will help you review what other people see when they look at your profile.
From here you’ll be able to see how your Timeline looks like to the public (to users who aren’t connected to you in any way), to your Friends or even to a specific person.
You can use this last feature in case you ever choose to hide a post from specific people and you want to see how it looks like when they look at your profile.
Before you post something on the timeline, you can choose to share the post with a Custom Audience (a specific list of Friends), specific Friends (if you want to manually add their names) or NOT share it with specific Friends (anyone you include here won’t be able to see that post unless you tag them).
From here you can also select who can see posts you’ve been tagged in on your timeline and who can see what others post on your timeline.
How can I manage tags people add and tagging suggestions?
If you activate the option to “Review tags people add to your own posts before they appear on Facebook”, you’ll be able to check and approve those tags. Thus, when someone adds a tag to one of your posts, you’ll be asked to review it before they appear on Facebook.
This is an option for tags added by friends. If someone who’s not your Facebook friend will add a tag to one of your posts, you’ll always be asked to review it.
Another setting from here: when you’re tagged in a post, who do you want to add to the audience if they aren’t already in it? Choose “Friends” if you want them to see the post you were tagged in, “Only Me” if you don’t want your friends to see it, or you can create a custom audience.
[Tweet “I found this comprehensive guide on how to secure my Facebook account”]5. Blocking
From the Blocking tab, you can restrict the way in which other Facebook users, apps or pages interact with you.
Here’s what exactly you can set from here:
Restricted List
This option is probably extremely popular among kids who don’t want their parents to see what they post, but they still want them to be friends on Facebook.
Here’s how it works: if you want to restrict a friend from seeing anything that you post, you add them to this list. They’ll still be able to see your public posts, those where you are both tagged in or where a mutual friend was tagged in, but that’s it.
Facebook won’t notify them when you add them to this list, so they won’t know.

Block users, messages, the app invites, event invites
In case you want to get rid of annoying users, games or events, this is the place to go.
From here you’ll be able to:
- Block users that you don’t want them to see your Facebook profile, add you as a friend, see what you comment on other profiles or pages or send you any kind of invitations (events or groups).
- Block someone from sending you messages and video calls. Yes, this one’s separate from the first option. Unless you also block their profile, they’ll still be able to post on your Timeline, tag you, and comment on your posts.
- Block a page – they won’t be able to interact with you anymore, with your posts or like or reply to your comments. If you currently like that page, by blocking it you will unlike it and unfollow it.
- Block any other kinds of app invites from someone.
Block event invites from someone – this way, you’ll automatically ignore future event requests from that friend. Use this for those PR people from your list, who try to exploit you by sending you all kind of irrelevant event invites.
[Tweet “I found lots of useful info in this Facebook security and privacy guide:”]6. Mobile
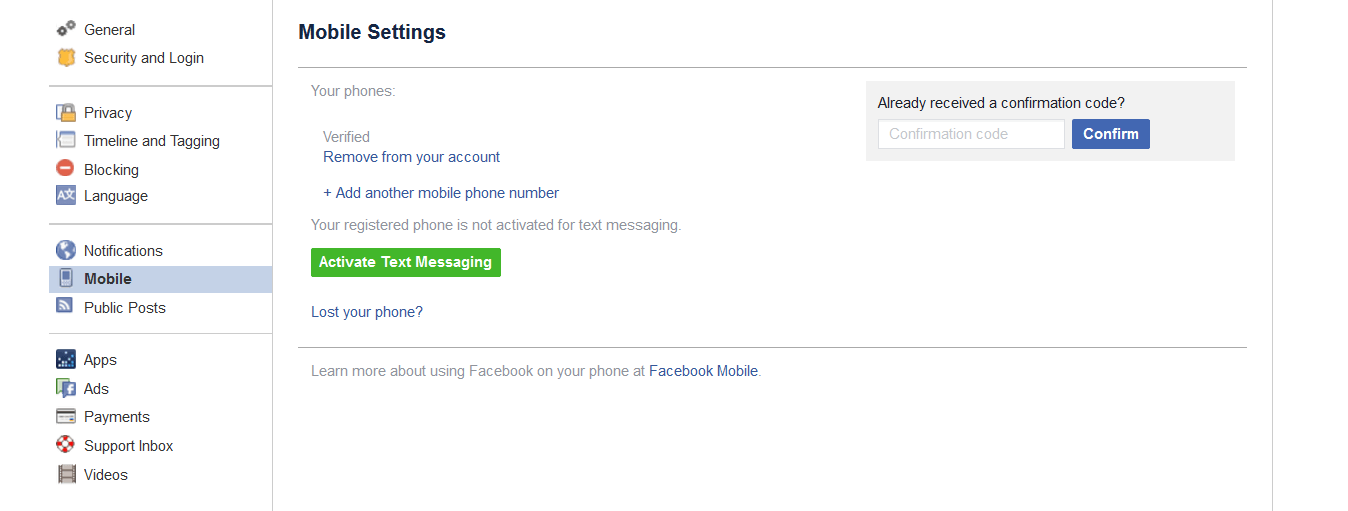
From the Mobile section, you can enter your mobile phone number (or numbers). You’ll use it when you activate your login credentials and need to receive the unique code for the second-factor authentication.
Here’s also the place where you can activate text messaging from. Facebook Texts are not currently supported by all countries or mobile service providers, but you’ll have a list here.
7. Public Post Filters and Tools
This section also has a few important privacy settings, from here you can:
- Choose who can follow you. Friends follow you and your posts by default, once you add them to your friends list, but you can also allow people who are not your friends to follow your public posts.
- Choose who can comment on your public posts. In case you want to somehow keep weird users away (or at least not have them interact with you and your friends).

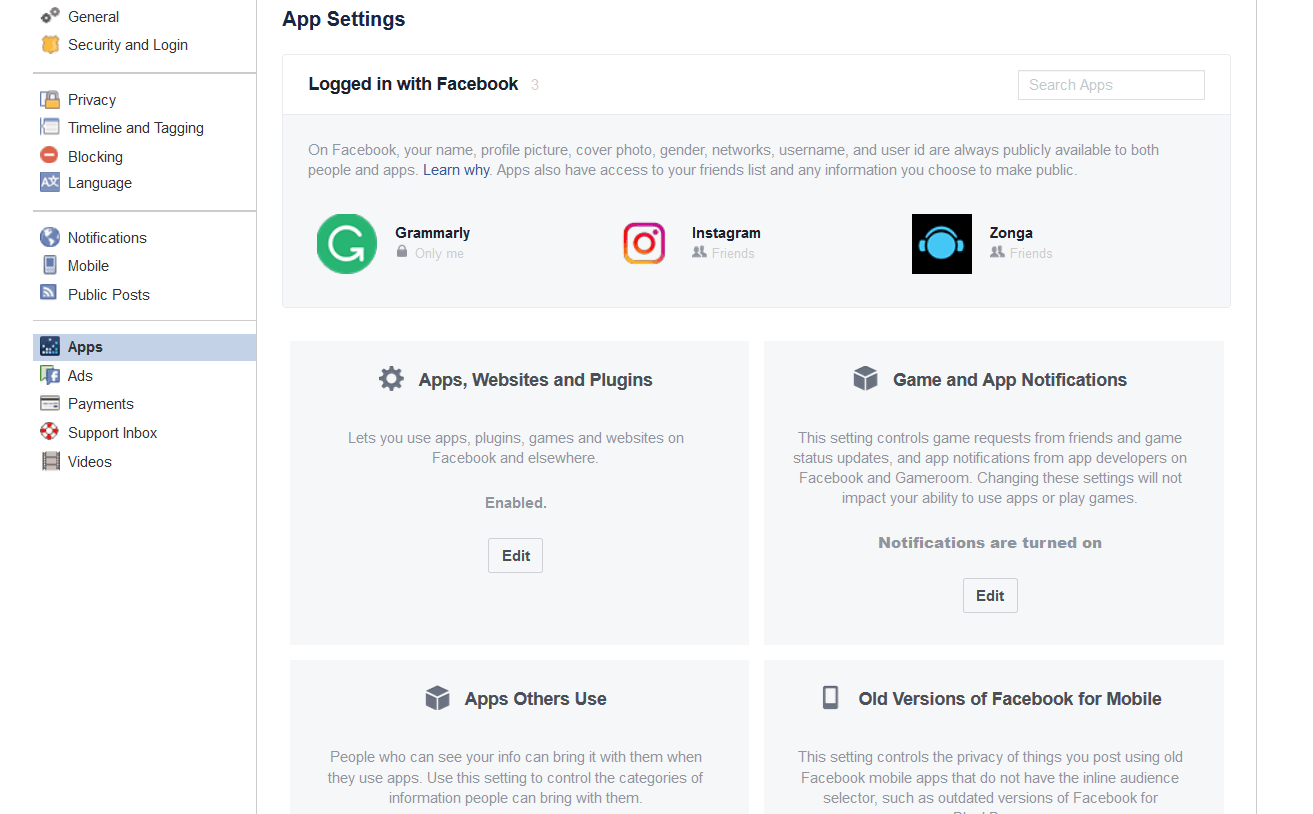
8. Apps
This one is among the most important privacy settings for your Facebook account.
The Apps section shows you what third-party apps you connected in the past, such as:
- Games;
- Other social media apps (Instagram, for example);
- Other social media websites (Medium, for example);
- Any other kind of apps or websites where you connected to your Facebook account.
Keep in mind that all these external apps can access all the tons of data collected by Facebook about us.
Review what permissions you gave to each of those apps and if they are allowed to post on Facebook on your behalf (and to what audience).
Decline any kind of intrusive apps and permissions allowed in the past. Disconnect any apps that you don’t remember giving them access or you don’t use anymore. All those are potential vulnerabilities to your security and privacy.
For more details on how to master app permissions, you can read the security guide from our colleague, Andra.
9. Ads
Do you want to allow third-party sites access to your personal information? Do you want Facebook telling your friends what you like? If you want to opt-out from these two options, simply select “No” or “No one” to these options. You are free to take control over your ad experience.
Useful tips and tricks to enhance your Facebook security & privacy
- Stop accepting friend requests from people you don’t know.
You may be targeted by online scammers who want to collect data about users by creating fake Facebook profiles.
Also, if you ever have enough time, do a clean-up of your friends list and remove anybody you don’t know or never interacted with.
- Do not disclose your password to any of your friends or work colleagues.
Trust me, you’ll regret this!
Even if they are your best friends now and you can’t imagine your life without them, you never know how your relationship is going to evolve.
All that information can end up being used against you (seen that happen way too many times by vengeful ex-employees, ex-lovers or friends who felt betrayed).
- Keep your browser updated.
This also goes for your plugins and add-ons, but also your operating system.
Keep them patched and up to date, in order to close all the security holes. It will help you reduce the chances of a cyber attack that exploits those vulnerabilities.
- Use good cyber security software.
A multi-layered security system will help you keep cyber attackers away.
Start by installing a good, trustworthy antivirus (if you don’t already have such a thing).
You can also enforce your security system with a traffic filtering software that works in a proactive way and blocks second generation malware (such as ransomware attacks). Heimdal is that kind of a software.
- Watch out for phishing attacks.
Pay attention to the various messages you receive from users asking for your personal data.
- Be careful of social scams.
Follow the previous link for a guide that exposes them and also gives tips on how to stay safe.
- Limit the connections to free, public wi-fi networks.
You can easily be tracked when you connect to one of those networks, so try to stay away from them as much as possible. However, if you do have to connect, try working through a VPN.
More tips here.
- Don’t forget to log out of your Facebook account.
In case you have to connect to Facebook from a different computer, one normally used by other persons, don’t forget to log out of your account at the end of the session.
Final thoughts
When a website becomes popular, you can also assume that scammers will be there, somehow trying to take advantage of it. Facebook is no exception to that because it is the most popular social network in the world.
Recently, cyber attackers threatened the Facebook users by spreading a suspicious link on Messenger.
It could happen again, so you need to keep your account safe and secure.

INSTALL IT, FORGET IT AND BE PROTECTED
Download Heimdal™ FREE* This article was written by Cristina Chipurici, in June 2016 and updated in September 2017. It was also updated in March 2018.


I am a thinker and dreamer human being. Passionate about online marketing and technology. Naturally curious and life long learner.


