


 Network Security
 Vulnerability Management
 Privileged Access Management
  Endpoint Security
 Threat Hunting
 Unified Endpoint Management
 Email & Collaboration Security


Contents:
A clear DNS cache is an easy way to solve connectivity issues, as well as prevent some of the most widely-encountered DNS-based cyberattacks. But how can you do that on your endpoints?
In the following lines, you will find an overview of what a DNS cache is, as well as the importance of flushing it, before diving into a step-by-step guide on how to achieve this on various operating systems as well as in your browser.
What is a DNS Cache?
The domain name system (DNS) cache is the computer’s storage area for recent queries to DNS name servers. When a user sends out a full DNS query including A records and/or MX records, these responses are kept in the DNS cache until they expire, either by the operating system or the browser.
These records map domain names to IP addresses so the domain name doesn’t have to be separately looked up each time it is referenced. When a user wishes to visit a website for the first time, the process can take anywhere from dozens of milliseconds to over a minute. However, if the user visits many times, then this process may take only milliseconds because the website record has been cached in the browser’s or system’s DNS Cache and the IP address doesn’t need to be looked up again.
A DNS server is connected to each hub/router. The latency time for a request for a domain name diminishes as it bounces along to each successive router. Determining the caching DNS server with the lowest latency time is key to accessing the name efficiently. Moreover, when one machine offloads an IP route request, the load gets distributed across those data centers. This results in faster ping and lookup times overall.
Why Should I Flush My DNS Cache?
It is a good cyber-hygiene practice.
Flushing your local DNS cache every once in a while is a good cyber-hygiene practice that both home and business users should consider. But why is it important? For one, it helps you make sure that the information stored on it is up to date.
You have connectivity issues.
Sometimes, the records stored by the cache can become outdated, as it takes them up to 48 hours to propagate across worldwide servers. This can cause some websites to not load properly, but performing a simple clear DNS cache operation can solve the issue in minutes. In addition to this, executing a flush on your local DNS cache is a simple fix to DNS server connectivity issues.
Prevents DNS spoofing attacks.
What is more, clearing the records regularly is a straightforward DNS security measure that helps you prevent DNS spoofing attacks. It’s no secret that hackers can sometimes intercept the queries you make online when trying to reach a particular website. Fortunately, a local DNS cache flush will prevent them from doing so or at least make their job a lot harder because resolvers need to obtain an authoritative answer for the request made in the browser before completing the process.
How to Clear DNS Cache on Windows
Does your machine run on the popular Windows operating system? Below, you will find step-by-step instructions on how to clear the DNS cache on Windows XP, Windows 7, Windows 8, and Windows 10 respectively.
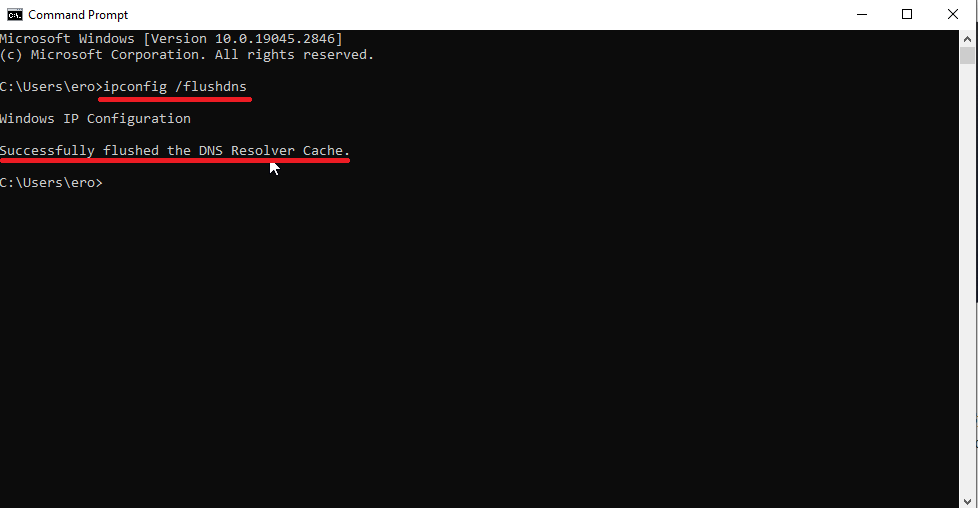
Clear DNS Cache on Windows 10
To clear the DNS cache on Windows 10 :
- Click on the Start menu / Windows button.
- Then go to Computer Systems > Command Prompt or alternatively type CMD in the search box (“Type here to search”).
- Once the CMD interface is open, insert
ipconfig /flushdnsCMD command and press Enter. - You should receive a message in the program confirming you cleared your DNS cache. After this is displayed, you can close the Command Prompt.

Clear DNS Cache on Windows 8
Finding the command line interface is a bit different in the Windows 8 variant.
- First, open the Apps screen,
- Then go to Windows Systems > Command Prompt.
- Once the CMD opens, run the same
ipconfig /flushdnscommand. - You should receive a notification confirming that your local DNS cache has been cleared once the process is completed.
Flushing DNS on Windows XP and 7
For Windows XP or Windows 7, start by clicking the Start button, then go to All Programs > Accessories > Command Prompt. Once you’re in the command line interface, run the same ipconfig /flushdns command.
How to Clear DNS Cache on macOS
To clear the local DNS cache on your Mac device, you first need to know what version of macOS it is running on. To find this out, click on the Apple icon on the top left-hand side of your desktop, then select About This Mac. The computer’s macOS version will be the first piece of information listed in the pop-up that appears.
After establishing this, you will need to access your Mac’s Terminal interface. This can be found under Go > Utilities > Terminal. Once that’s open, depending on what version of macOS the computer has, you will need to enter a specific command. You can find them all detailed in the sections below.
Clear DNS Cache on macOS 10.5 (Leopard)
To flush the DNS cache on macOS 10.5, you will need to insert the following line in your Mac’s Terminal:
sudo lookupd -flushcache
Once this step is complete, you will be prompted to verify your device password and if you manage to do so, the cache should be cleared.
Clear DNS Cache on macOS 10.6 (Snow Leopard)
If you are running macOS 10.6, input the following command after opening the Terminal tab:
sudo dscacheutil -flushcache
To finish the process and clear the local DNS cache, make sure to enter your device password when requested to.
Flush DNS Cache on macOS 10.7-10.9 (Lion/Mountain Lion/Mavericks)
For macOS versions 10.7 through 10.9, the command that flushes the local DNS cache is:
sudo killall -HUP mDNSResponder
After inserting it into the Terminal program, you will need to, you guessed it, confirm your device’s password to complete the process.
Clearing DNS Cache on macOS 10.10 (Yosemite)
When it comes to macOS 10.10, you will have to run the following command in your Mac’s Terminal:
sudo discoveryutil udnsflushcaches
Then, make sure to confirm the process with your device password, and your cache should be all set and cleared.
Clear DNS Cache on macOS 10.11-10.15 (El Capitan/Sierra/High Sierra/Mojave/Catalina)
For macOS versions that are 10.11 or higher, the Terminal command you need to enter is as follows:
sudo killall -HUP mDNSResponder
After running it, you will be asked to enter your computer’s password. Do as instructed and the device’s local DNS cache should be clear.
How to Clear DNS Cache on Linux
Just like macOS, Linux uses Terminal as a command line interface. To open it, click on the Activities tab in the top left-hand corner of the desktop and type ‘terminal’ in the search bar that pops up. Then, you have to type one of two possible commands in there, depending on what Linux distribution your device is running on.
Flush DNS Ubuntu
For Ubuntu, the following command needs to be input into the Terminal:
sudo systemd-resolve --flush-caches
Then, just like on Mac once again, the Terminal program will prompt you to confirm the operation with your password. Do so, and complete flushing the local DNS cache.
Clearing DNS Cache on Other Linux Distributions
In the case of Linux distributions other than Ubuntu, run the following command in the interface to clear the DNS cache:
sudo /etc/init.d/dns-clean start
This time around, you will not need to confirm the operation with a password. After inserting the appropriate command, the process should be finished.
How to Clear DNS Cache on Google Chrome Browser
As mentioned before, DNS records are stored by either the operating system or the browser. Thus, sometimes you might have to flush the DNS cache on your browser instead. To do so in Google Chrome, simply enter the following address in the search bar:
chrome://net-internals/#dns
This will lead you to the page pictured below.
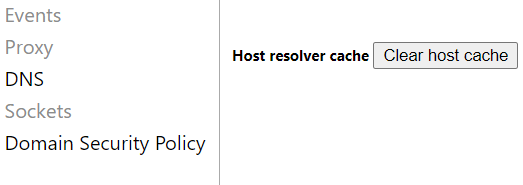
Click on the Clear host cache button and Google Chrome’s DNS cache will be flushed.
Clear DNS Cache on Microsoft Edge
The Microsoft Edge browser is running on the same Chromium engine as Google Chrome, so the process for flushing the DNS cache is the same. Just type the following line in the address bar then click on the “Clear host cache” button:
edge://net-internals/#dns

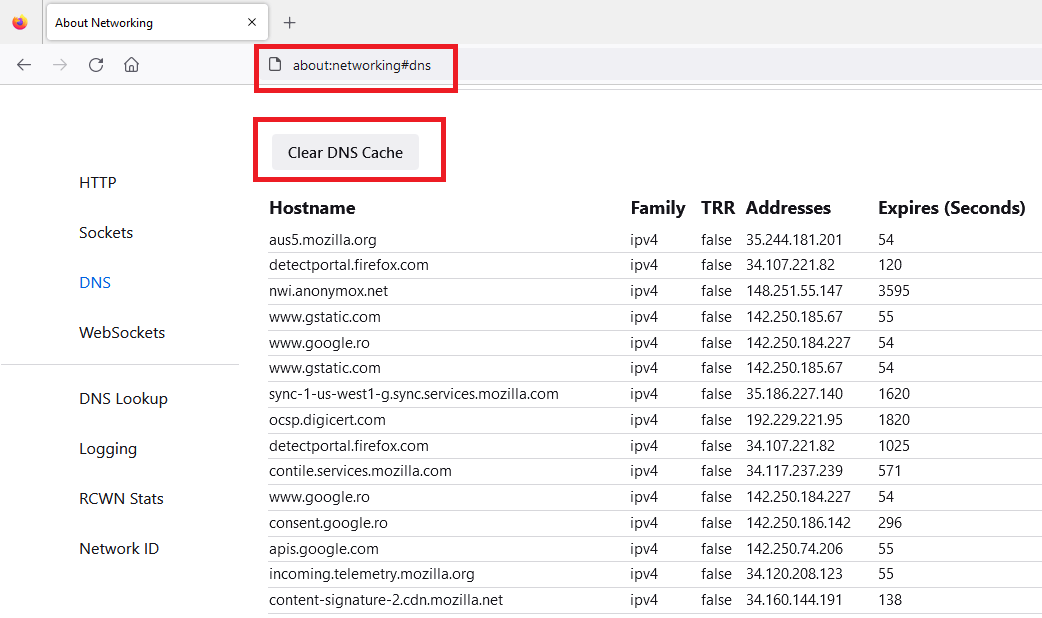
Clear DNS Cache on Mozilla Firefox
The Firefox browser works a little differently than other browsers because it only stores resolved DNS entries in memory and not on the hard disk. This means that every time you close the browser, the DNS entries will be lost. Anyway, if you still want to clear the DNS entries without closing the browser, just type this line in the address bar then click on the “Clear DNS cache” button:
about:networking#dns
Final Thoughts
Performing a regular flush on the local DNS cache on your endpoints is a safe and simple way to not only prevent network connectivity issues but cyberattacks as well. Do you want to take it one step further? A solution such as our Heimdal™ Threat Prevention can help you further enhance DNS security on your endpoints. Sign up for a free 30-day trial and find out how.
Heimdal® DNS Security Solution
- Machine learning powered scans for all incoming online traffic;
- Stops data breaches before sensitive info can be exposed to the outside;
- Advanced DNS, HTTP and HTTPS filtering for all your endpoints;
- Protection against data leakage, APTs, ransomware and exploits;
If you liked this article, follow us on LinkedIn, Twitter, Facebook, YouTube, and Instagram for more cybersecurity news and topics.


Alina Georgiana Petcu is a Product Marketing Manager within Heimdal™ Security and her main interest lies in institutional cybersecurity. In her spare time, Alina is also an avid malware historian who loves nothing more than to untangle the intricate narratives behind the world's most infamous cyberattacks.


