


 Network Security
 Vulnerability Management
 Privileged Access Management
  Endpoint Security
 Threat Hunting
 Unified Endpoint Management
 Email & Collaboration Security


Contents:
The only measure most people use to protect their home wireless network nowadays is to set up a password and prevent neighbors and other people from taking control of your data. But we have to be more serious about home network security and do more than just setting a simple password.
Installing a virtual private network (VPN) solution is a great security add-on for the home devices you use most often. Creating a private network from a public connection, allows you to browse the Internet safely and maintain your data privacy. In this way, malicious actors will have a very hard time tracking you down online.
Securing the home network has two main components. The first one is router security, whose foundation is investing in a high-quality next-generation device that comes with inbuilt security controls. This will allow you to set up a firewall, VPN, parental controls, and even DNS filtering from the router itself.
The second component to keep in mind is securing the devices that connect to the network via the router. This includes both wireless and cable links.
In this article, you will learn how you can better protect your network connection and decrease the chances of getting your valuable data compromised. Use these steps below to enhance the security of your home wireless network.
How to Secure Your Wi-Fi Router
Step 1. Update the router firmware to the latest available
The software is an essential part of your wireless network security. The wireless router’s firmware, like any other software, contains flaws that can become major vulnerabilities and be ruthlessly exploited by hackers.
Unfortunately, many wireless routers don’t come with the option to auto-update their software, so you have to go through the hassle of doing this manually. And even for those Wi-Fi networks that can auto-update, it still requires you to switch on this setting.
But, we remind you about the importance of software patching and how neglecting to do this can leave open doors for cybercriminals to exploit various vulnerabilities. Read what security experts have to say about updating your software and why it is key to online security.
Step 2. Change your router administrator login
To set up your wireless router, you usually need to access an online platform or site, where you can make several changes to your network settings. You can usually access this by entering your router’s IP address into your web browser.
If you have a new router, you can find its IP address listed on the manufacturer’s website or in the product manual you were provided with upon purchase. However, if your device is rather old, you can still discover its IP by following this handy guide.
These basic steps will teach you how to easily connect to your home network as an admin. Usually, the address bar type looks like http://192.168.1.1 or http://192.168.0.1.
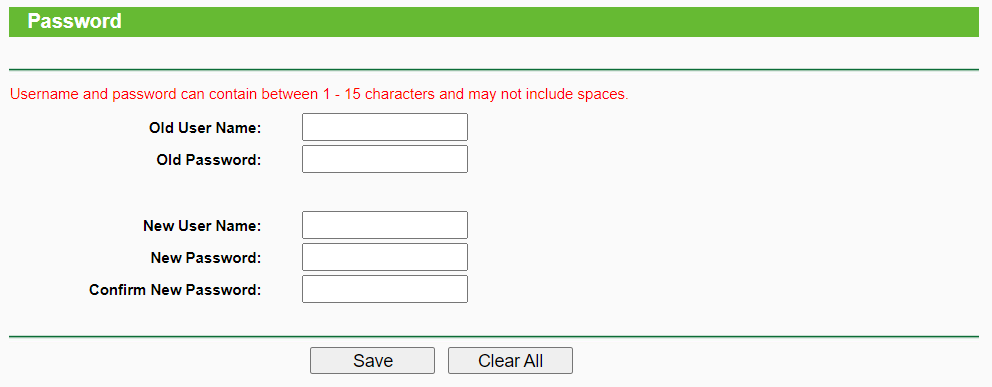
Most Wi-fi routers come with default credentials such as “admin” and “password” which are easy for malicious hackers to break into. Therefore, you need to access the router’s settings and change them to unique credentials that cannot be guessed so easily.
My recommendation is to create a username that isn’t personal to you in any way and pair it with a strong password that contains both uppercase and lowercase letters, as well as alphanumeric characters.
Step 3. Change the default Wi-Fi network name
If you want better wireless network security, the first thing you should do is to change the name of your Wi-Fi network, also known as the SSID (Service Set Identifier). While giving your Wi-Fi a somewhat provocative name such as “Can’t hack this” may backfire at times, other names such as “this is not a Wi-Fi” or “too fly for a Wi-Fi” are perfectly acceptable.
Changing your Wi-Fi’s default name makes it harder for malicious attackers to know what type of router you have. If a cybercriminal knows the manufacturer name of your router, they will know what vulnerabilities that model has and then try to exploit them. We strongly advise not to call your home network something like “John’s Wi-Fi”.
You don’t want them to know at first glance which wireless network is yours when there are probably three or four other neighboring Wi-Fis. Also, remember that disclosing too much personal information on a wireless network name may expose you to an identity theft operation. Here’s a step-by-step and simple guide that explains how you can easily change the name of your wireless network.
Step 4. Set a strong Wi-Fi Password and activate the highest encryption possible
You probably know that every wireless router comes pre-set with a default username and password, which is needed in the first place to install and connect your router. The worst part: it’s easy for hackers to guess it, especially if they know the manufacturer.
So, make sure you change them both immediately. A good wireless password should be at least 20 characters long and include numbers, letters, and various symbols. And, most importantly, don’t use the same password as the router admin one.
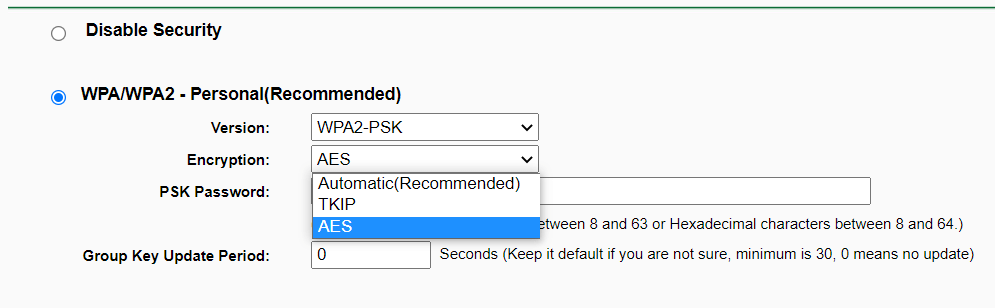
As for encryption, wireless networks come with multiple encryption languages, such as WEP, WPA, WPA2, and WPA3. To better understand this terminology, WPA2 stands for Wi-Fi Protected Access 2 and is both a security protocol and a current standard in the industry (WPA2 networks are almost everywhere) and encrypts traffic on Wi-Fi networks.
It also replaces the older and less secure WEP (Wired Equivalent Privacy) and is an upgrade to the original WPA (Wi-Fi Protected Access) technology. Since 2006, all Wi-Fi-certified products should use WPA2 security.
WPA2 AES is also a standard security system now, so all wireless networks are compatible with it. If you want to enable WPA2 encryption on your Wireless router, use these six steps. If you are using a TP-Link wireless router, here’s how to secure your wireless network.
The good news is that the WPA3 is already here and is gradually replacing WPA2. In 2018, the Wi-Fi Alliance announced its next-generation wireless network security standard which aims to solve a common security issue: open Wi-Fi networks. More than that, it comes with security enhancements and includes a suite of features to simplify Wi-fi security configuration for users and service providers.
Step 5. Use a guest network Wi-Fi for visitors
Keeping your main Wi-Fi connection private and accessible only to permanent residents of the house is a good way to stave off cyberattacks. Don’t give your credentials to anyone, be them neighbors or close friends. You never know with whom and under what circumstances they share your login details.
And even if they don’t do that, they might still connect to your network with an infected device when they visit. This can and probably will infect all your connected devices. Having a separate network limits the risk of the threat spreading to every single machine linked to your Wi-Fi.
When setting up your visitor network, make sure to create a different password than you have on your main Wi-Fi, for obvious reasons. After all, you don’t want to go through all this trouble of having a secondary connection, just to have it all be in vain because its credentials were the same as for your primary one.
Step 6. Set a different Wi-Fi network for your IoT devices
While we’re on the topic of setting up separate Wi-Fi connections, it’s a good idea to do the same for your IoT devices. Why? Because most IoT devices have very poor security and can easily be compromised. This will result in the infection spreading to all the devices in that network.
Having a separate connection is a simple way to solve this issue. Again, remember to set a different password for this network so that hackers can’t infer what your main Wi-Fi password is by having access to this one.
Before creating a separate Wi-Fi network, keep in mind that many IoT devices can connect only to 2.4GHz networks. This means that you might need to set up a different Wi-Fi for them, in case you were wondering why you can’t connect your smart vacuum cleaner to your main 5GHz network.
Step 7. Disable WPS (Wi-Fi Protected Setup)
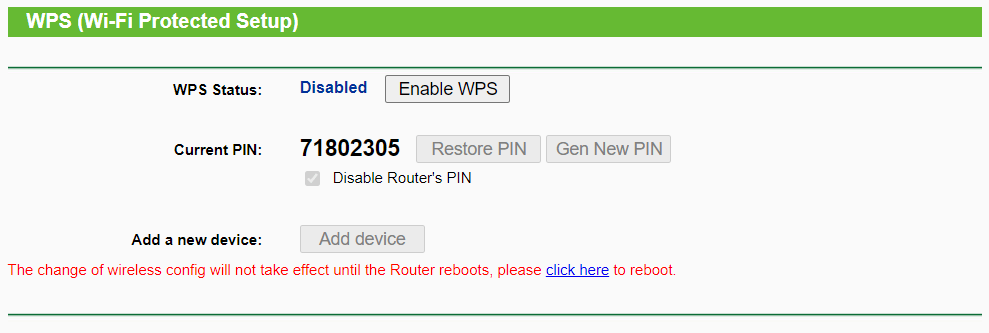
The WPS feature on your router has been designed to facilitate adding new devices to the network for people that aren’t particularly tech-savvy. It achieves this by reducing the entire process to the push of a button or the entry of a PIN code.
And while Wi-Fi Protected Setup does indeed make connecting to the Internet a lot easier for people that don’t know a lot about it, it is also very unsafe. Leaving it enabled means that hackers could potentially obtain your login credentials in a matter of hours. Therefore, I strongly advise disabling it on your home network.
To do so, open your router’s online platform and go to the Wireless tab in Advanced Settings. There, you should find the WPS menu. Select or toggle ‘Disable’, then reboot your router and you’re done.
Step 8. Hide your Wi-Fi Network Name (SSID broadcast)
Hiding your connection’s name is another way to enhance your home network security. This is another operation you can perform on the router’s online settings platforms. Access it as described in the sections above, then go to the Wi-Fi > Wi-Fi Security Settings tab in the Advanced Settings menu. Click the SSID and check the Hide Wi-Fi box. Don’t forget to save your changes.

The network will now appear as Hidden Network and you’ll have to manually type its name to connect. If you don’t know the network name, you can’t connect. There are ways to uncover a hidden SSID name, but this is still a good practice to secure your Wi-Fi even more.
Step 9. Change the default router admin IP address
Changing the default IP address to a less common one is another thing you should consider doing to better secure your home network and make it more difficult for hackers to track it. To change the IP address of a router, you should follow these steps:
Log into your router’s console as an administrator. Once you are there, insert the username and password on the login page. Then select Network > LAN which is in the menu on the left side. Change the IP address to preference, then click Save.
Note: After you’ve changed the IP address, you’ll need to type the new IP address into the web browser bar. You can also change the DNS server that your Wireless router is using to filter the Internet traffic and this guide will show how to do it.
Step 10. Enable MAC address filtering
To further limit what devices can connect to your Wi-Fi network, I recommend enabling the MAC address filtering option. Access your router’s web interface and look for the option. It might be listed as either MAC Filter, Network Filter, Access Control, Network Access, or something like that. You will find it under either the Security, the Wireless, or the Advanced menu.
By enabling it, only specified MAC addresses will be able to access the network. Optionally, you can also do an IP and MAC binding, a process known as ARP Binding. By doing this, you are assigning a unique IP for each MAC address, so the device will connect using the same IP every time.
Step 11. Disable remote admin access
Most routers allow you to access their interface only from a connected device. However, some of them allow access even from remote systems. Once you turned off the remote access, malicious actors won’t be able to access your router’s privacy settings from a device not connected to your wireless network. To make this change, access the web interface and search for Remote Access or Remote Administration.
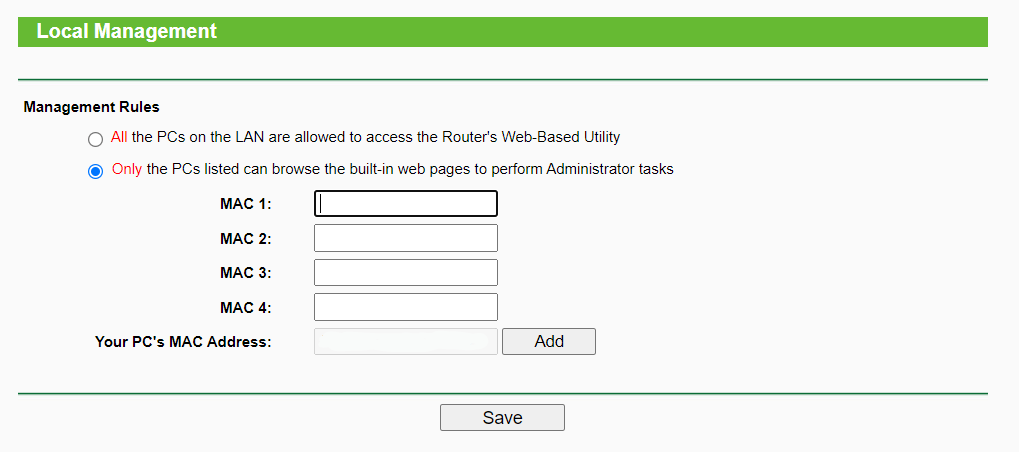
Step 12. Limit the local admin access to your router
Limiting local admin access to your router is another step towards monitoring your home network security. This is done by manually assigning the MAC addresses of the white-labeled devices from the router’s web interface. For example, you can give admin access to only 2 devices, your main PC and your smartphone. This will prevent anyone else but you from having this level of entry into your network.
Step 13. Activate the additional security features of your router
Next-generation routers come with inbuilt basic security features, as well as more advanced ones. If your device allows it, my recommendation is to activate all of them to further enhance your home network security.
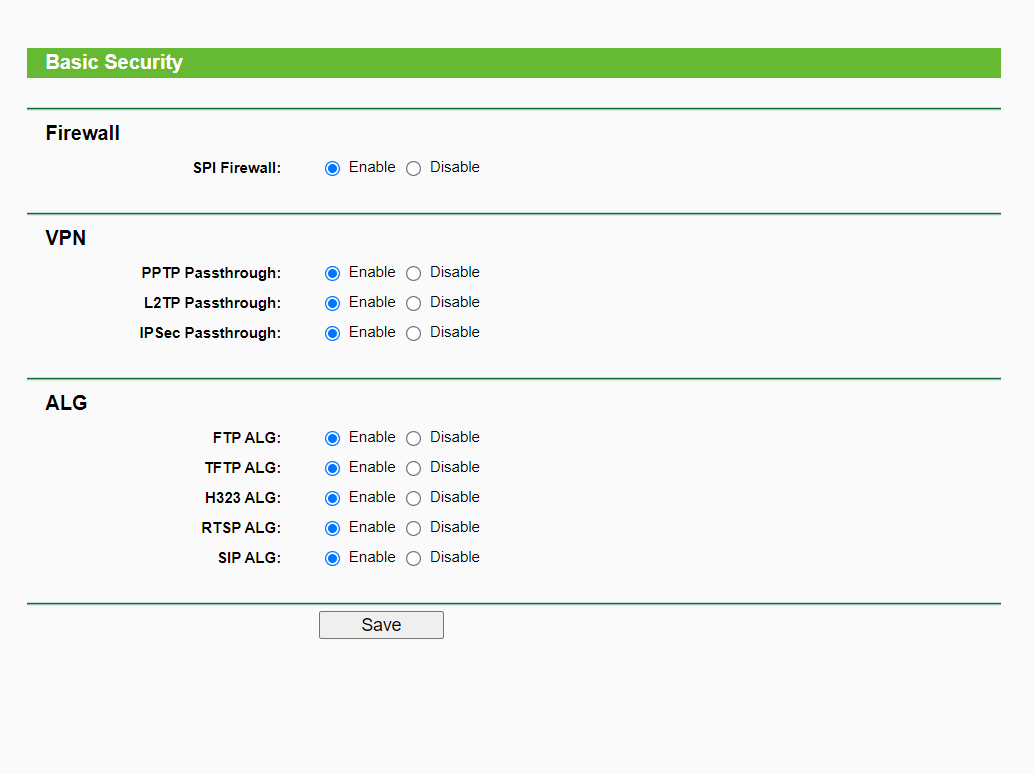
In terms of basic security features, there are three main ones you will encounter in the dedicated tab of your router’s web interface.
- Stateful Packet Inspection (SPI) Firewall, which monitors your sessions and validates all the traffic passing through the network. This feature is enabled as a factory default, so keep it that way if you want to prevent a cyberattack.
- Virtual Private Network (VPN), which must be enabled if you want to allow VPN tunnels that use corresponding protocols to pass through your home network.
- Application Layer Gateway (ALG), which should always be activated because it allows you to customize which application control data protocols pass through your network through Network Address Translation (NAT) filters.
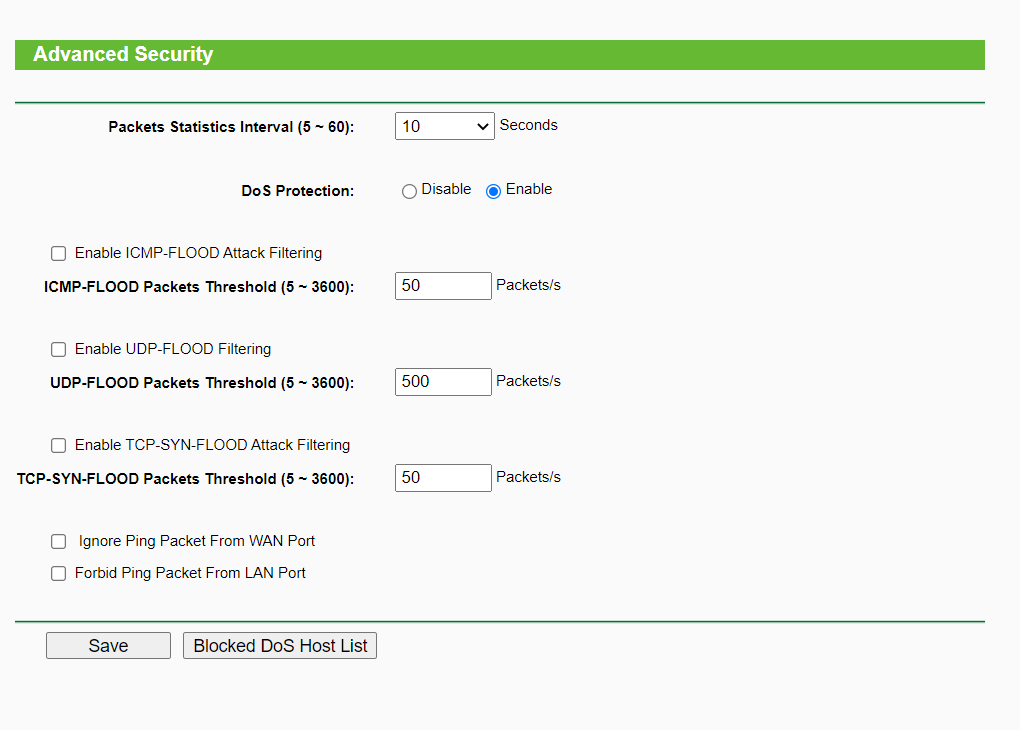
After these three defensive layers are enabled, you should also have a look at the Advanced section of your device’s security settings. These will protect your router from falling victim to traffic flooding attacks.
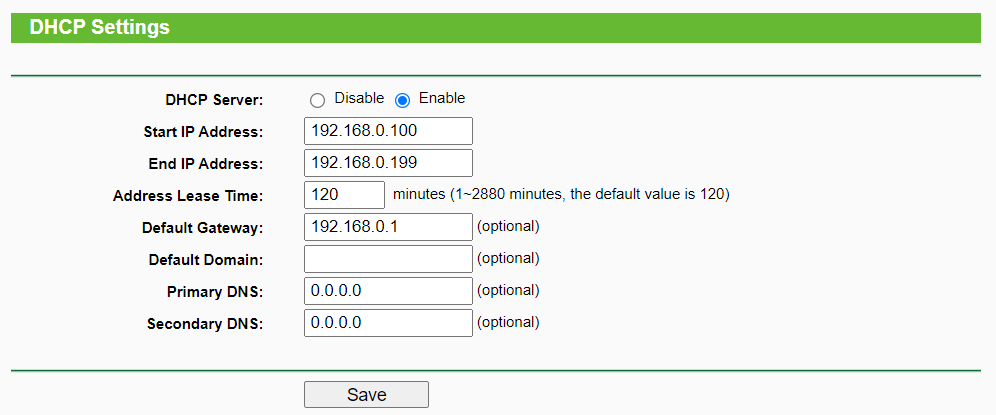
Some websites also mention disabling DHCP functionality on the router but I strongly advise keeping it enabled. If disabled, you’ll have to manually assign an IP for each connected device from the device itself, not the router admin.
Turning off the router is another often mentioned advice that is obsolete in today’s digital landscape, as it defeats the whole purpose of IoT. When you leave the house, you will naturally want to be able to monitor your surveillance cameras or turn on the air conditioning and heating before you get home, and so on.
With so many connected devices in our homes, this can be a tedious task and, if not done properly, you’ll have IP conflicts and connectivity issues. Not to mention that for most IoT devices you can’t even manually assign the IP, which renders this method obsolete for today’s home networks.
None of these measures are bulletproof, but applying them is a good start towards increasing your home network security. All of them can be bypassed by a knowledgeable person. Do your best not to become a direct target.
Enhance Protection for Each Device Connected to the Router
1. Use a strong antivirus solution
As I’ve mentioned in the introduction of this article, fortifying your Wi-Fi router is just one component of home network security. To further protect your household devices from hackers, you will need to enhance your protection on each one.
The most accessible starting point for this is by installing a strong antivirus solution. One of the most common cybersecurity solutions for home users out there, AV is designed to prevent, detect and block malicious code from entering computers. It achieves this by continuously scanning the files that make their way into your devices against a database of known viruses and other types of malware.
2. Patch your software
Unpatched software is one of the most common liabilities that hackers exploit to gain unlawful entry into your home network. To make sure malicious actors can’t take advantage of vulnerable applications, you will need to keep your devices up to date.
Unfortunately, this is something many people constantly overlook, as it can become quite disruptive and take up a large chunk of their time. Heimdal™ Threat Prevention Home can help you make the process a whole lot easier and mitigate this risk in your household.

Threat Prevention Home installs both security and feature patches as soon as they are released by their respective developers. It does so with minimal interruptions and without the need for reboots, effectively closing 85% of the gaps in your device’s security.
3. Install a VPN solution
Installing a virtual private network (VPN) solution is a great security add-on for the home devices you use most often. By creating a private network from a public connection, it allows you to browse the Internet safely and maintain your data privacy. In this way, malicious actors will have a very hard time tracking you down online.
As I mentioned in the previous segment of the article, some routers allow you to enable the VPN to run directly on them. If yours comes with this feature, that means that you have a fast and easy way to secure every single device that connects to your home network. Still, some routers do not support this feature.
One solution to run a VPN on a router that doesn’t support this feature built into it is DD-WRT, an open-source firmware that adds extra features to your device. It does this by acting as an admin platform where the router’s firmware is rewritten to include more benefits.
This is something to remember as it means you will lose your warranty if the device is new. Plus, it’s not compatible with every single make and model out there, but you can find a full list on the website.
Ideally, you should run the VPN on both your most widely used devices and the router. In this way, you will not only achieve home network security, but also make sure that your laptop or smartphone are protected when you connect from outside the house.
4. Don’t forget about DNS traffic filtering
Another way to achieve advance home network security for connected devices is through DNS filtering. Through this process, you can easily block malicious websites, as well as screen for unsafe or inappropriate content.
Besides stopping cyber attackers in their tracks, this solution is also handy when setting up filters such as parental controls. Our Heimdal™ Threat Prevention Home can help you with this too.
5. Research IoT devices before buying them
Are you looking to add a new IoT device to your home network? To maintain an adequate level of security for your connection, make sure that you research it thoroughly beforehand. Getting a surveillance camera or a smart mop might sound simple, but these devices can come with a lot of vulnerabilities in their firmware.
Final Thoughts
Securing the home network should be a top priority for each of us interested in keeping the data safe and secure. These steps can be really useful even for the non-tech-savvy person to apply. Also, do not forget that your wireless network security can be sometimes weak, and prone to exploits.
This is why I’ve written this guide on how to secure your wireless network and the devices connected to it. By following the advice in it, you will enhance your home network security and prevent as many cyberattacks as possible. Of course, none of these methods are failsafe, but they are a worthwhile effort that will diminish threat risks in your household as much as possible.
Last edited by Alina Georgiana Petcu on August 2021.


Alina Georgiana Petcu is a Product Marketing Manager within Heimdal™ Security and her main interest lies in institutional cybersecurity. In her spare time, Alina is also an avid malware historian who loves nothing more than to untangle the intricate narratives behind the world's most infamous cyberattacks.


